“For your Mistle-toes” Christmas gifts

Last Christmas I came across this great DIY gift – a pedicure kit with a seasonal play on words – ‘For your mistle toes!’ I thought it would be great to give to friends, so I set about designing my own.

DIY Mistle-toe gifts | Shelley Makes

You will need:

  • Pedicure kit e.g. nail varnish / mini foot cream / nail file
  • Small cellophane bags
  • Gold or silver metallic card
  • Printer
  • Rota-trim or scissors
  • Stapler

Instructions: 

I designed my labels in InkScape, using free fonts from DaFont.com, and ended up with two different designs. On one side it read ‘For your mistle toes’, and on the other ‘To Natalia’, or whoever.

The main thing to remember if you design your own is to flip the font on one half so it’s upside down. You also need to check that the printed result is the same width as your cellophane bag.

Once designed, I printed my bag toppers onto silver and gold metallic card (I had to feed this into my printer rather than leave it in the tray, as it’s quite a bit thicker than normal card stock).

Becky Mistle-toes | Shelley Makes

Once printed, I cut out each gift topper using a rota-trim, and then used the rota-trim again with a perforated blade to help me fold the tags in half, but you could just fold carefully as normal.

Continue reading

DIY Rainbow Paper Weave Gift Topper

A while ago I spied this amazing woven DIY gift topper on Minieco.co.uk. Using nothing but coloured paper, it’s possible to make this incredibly easy, bright and cheerful present topper!

IMG_2874 USE

As my sister is a huge fan of colour – particularly rainbow colours, I decided to weave her one of these cute toppers to decorate the plain envelope containing her birthday present.

Back of envelope

How to make it

All you need is a few sheets of coloured paper (I used A4, although A3 would allow you to go round a larger present) and a guillotine. I used five colours, but you can use as many or as little as you like.

How to make

Start by cutting equal-sized strips of coloured paper on the guillotine. I used two 1cm strips of each colour, so 10x strips in total. Once cut, place 5 strips vertically in a line on a flat surface, and weave the remaining 5 strips horizonally into it following the same colour pattern – like so:

http___makeagif_com__media_9-14-2014_xdFIjS

The idea is to go under, then over, then under, then over etc, and to alternate the pattern so that a different colour is on top for every other weave. For example, it will go red, orange, red, green, red.

Gift topper

My strips weren’t quite long enough to go around the whole envelope, so I simply folded the paper round the edges of the envelope and secured the ends in place with some double-sided tape.

It really is ridiculously easy to make, and makes a very colourful first impression!

DIY Present Gift Bows – Part III

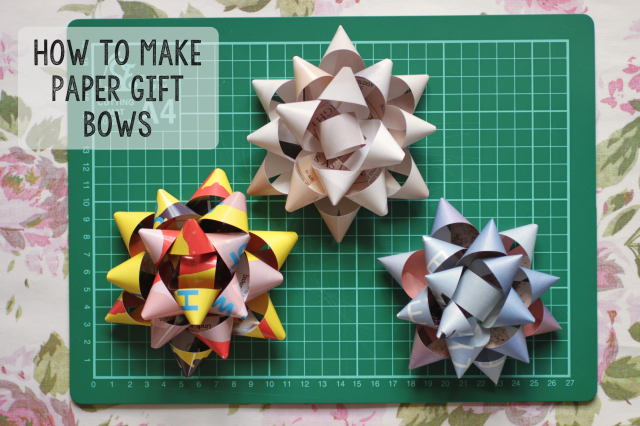
Back in March I showed you how to make DIY Gift Bows from magazines. When I made the bows, I made a trio of three; here’s the third and final installment – using a Grey Goose vodka ad!

How to Make Paper Gift Bows

You will need: Colourful page from a glossy magazine, pencil, ruler, scissors, glue stick

Instructions – adapted from How About Orange:

  1. For best results pull out a glossy page from a magazine which is colourful on both sides
  2. You can make your bow any size, as long as each series of strips is about an inch shorter than the one before. The longer the strips, the bigger the bow
  3. For a typical magazine, you will be cutting out nine (or ten) strips of paper as follows:
    • 3 strips: 10.5 x 0.75 (inches)
    • 3 strips: 9.5 x 0.75 (inches)
    • 2 (or 3) strips: 8.5 x 0.75 (inches)
    • 1 strip: 3.5 x 0.75 (inches)
  4. Twist each strip to form a loop, and glue in place to create perfect points at both ends
  5. Take the three longest strips and layer them on top of each other, spacing evenly and glue
  6. Repeat this process with the remaining strips, glueing together and spaing at intervals
  7. Glue the final strip into a circle and stick into the centre of the bow – et voila!
  8. Attach the bow to your pressie with a glue dot or double-sided tape

The final collection:

Which one is your favourite?

  1. Lancome advert
  2. Grey Goose advert
  3. The Sunday Times Magazine

Why not give it a go!

DIY Paper-Cut Christening Card

On Sunday, Jack and I went to our first Christening for a baby girl named Lauren. This was the first time we’d met Lauren, but as we’re huge fans of her parents, we knew we’d be sold!

To mark the occasion, we decided to make a personalised paper-cut card with a scalpel and a steady hand… you have to be careful to leave all parts connected to the main frame.

IMG_0711 USE

In Pictures:

The finished result you see here was done by Jack – he was far more skilled with the craft knife than me! If in doubt, leave it to the experts!I’d love to know what you think?

What are your Christening creations?

‘You Rule’ DIY Valentine Present

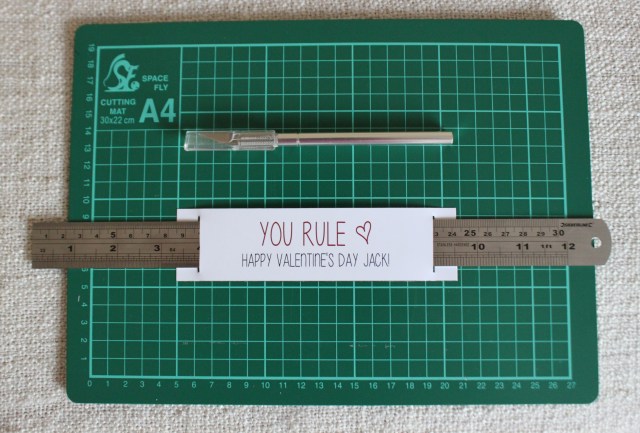
The other week I came across this cute Valentine design on Pinterest and thought I’d give it a go! All you need is some paper or card, scissors (or a guillotine), a craft knife, and of course a ruler!

IMG_6323

After buying a cheap metal rule from Amazon, I designed a ‘You Rule’ sleeve in InkScape before printing it, trimming it, and making the two slits with a craft knife for the ruler to slot through.

IMG_6332

Like so! After making the ‘basic’ edition, I also experimented with a double-sided beast with a different message on the back. You can play with whatever words you want.

I went with ‘You Rule’ and ‘<— I love you this much —>’ but you can be as cheesy as you like!

Simple Design:

You Rule

Double-Sided Edition:

You Rule Double-Sided

The double-sided edition just requires a bit of Pritt Stick to seal the deal. It’s that easy!