DIY Papercut Christening Card

Last Sunday, Jack and I went to the christening of a baby boy named Carl. We made a paper-cut card for Carl’s big sister Lauren when she was christened a few years ago, so we thought we’d stick to the same style for her little brother, but this time using my Silhouette cutting machine, instead of a scalpel!

DIY Paper-Cut Christening Card (10) - Copy

Jack designed the paper-cut image using InkScape (free downloadable vector graphics software), which allows you to import images and convert them to line art, as well as draw various shapes. Jack imported three free line-art images from Google – a heart, a church, and a balloon. After importing and embedding the images, he traced the bitmaps and converted the images into two colours (black and white), so that he could see which sections would be cut out, and which would stay connected.

Once the vector had been generated, Jack modified the image using the node tool, which allowed him to remove unwanted features (such as complicated details on the windows), as well as change certain design elements (such as the door archway). He also created a cute picket fence and bunting.

DIY Christening Card InkScape

Continue reading

Meet Albert & Me – Crochet Goodies

Before you all jump to the conclusion that I have a secret love child named Albert, let me introduce the guest of this post – Kate, the mother of Albert (below), and my #CraftBlogClub Secret Santa!

#CraftBlogClub Crochet on Shelley Makes (3) USE

You might have seen a few #CraftBlogClub Secret Santa posts from me this year; I blogged about what I made for ZoFlo here and here, but I have forgotten to blog about one important element – what I received! In this post, I wanted to spend some time showing off the amazing crochet goodies that I received from my Secret Santa – Kate, from Albert & Me (formerly Beak Up Crafts).

IMG_4595

As Kate has recently rebranded her blog to reflect a new lifestyle photography business venture, I thought it was a great opportunity to introduce Kate to you all, and her awesome work. Kate has kindly agreed to answer my burning questions, so find the Q&A below, interspersed with crochet.

First of all, how did you learn to crochet? 

“I learnt crochet by watching American YouTube videos although it took me a while to realise that stitches were called by different names in the UK! I started to learn crochet as a form of mindfulness and figured that, as there was only one hook compared with two knitting needles, it would be easier to learn for someone uncoordinated like me!”

#CraftBlogClub Crochet on Shelley Makes (6) - USE

Continue reading

Inspiration: DIY Valentine’s Day Papercraft

It’s already officially less than a month until Valentine’s day! Whether you have a significant other or a secret valentine, show them you care with one of these super easy papercraft DIYs.Valentine Heart Inspiration 2016 III

These simple tutorials are all by Minieco:

1. Boxed Geometric Heart | 2. Dot Matrix Valentine’s Day Cards | 3. Geometric Heart Pop-up Card | 4Geometric Heart Love Letter

What are you making this Valentine’s day?

#CraftBlogClub: DIY Cupcake Pin-Cushion Ring

In my last blog post I told you about the felt cupcake needlebook that I made for ZoFlo as part of the #CraftBlogClub Secret Santa. This post looks at the accompanying DIY cupcake pin-cushion ring!

DIY cupcake pin cushion ring | Shelley Makes

This ring DIY is an amalgamation of two tutorials I spied on Pinterest – the main one is by Obsessively Stitching, whose excellent tutorial told me how to make a basic cupcake pin-cushion ring.

Cupcake felt needle book | Shelley Makes

Against Obsessively Stitching‘s advice, I made my pin cushion using felt, rather than fleece, as it had to match Zoe’s needle-book (soz), but I must admit I was still happy with the end result.

DIY cupcake pin cushion ring | Shelley Makes

To make a cupcake pin cushion ring, you will need:

  • A4 sheet of felt (in two colours – 1 for base; 1 for frosting)
  • A bottle cap (such as Cherry Coke or 7UP)
  • Sewing thread (mine is Hobbycrafts Value Crafts range)
  • Stuffing (e.g. soft toy filling – hi-loft polyester)
  • Sharp scissors
  • An elastic hair-band (You can get these from Boots, Tescos…)
  • Red button (optional – for cherry)
  • Dress pins

Instructions:

For the cupcake ‘frosting’, I cut around a tea-light candle jar about 3.5 inches in diameter (a bit bigger than Obsessively Stitching‘s recommendation). Next, I threaded around the edge of the circle, before tugging the ends to make it gather – it looks like a baby jelly fish until stuffed!

Continue reading

Homemade Jam & Chipotle Jar Labels

Tis the season to start crafting! Are you making any homemade gifts this year? I’ve finally got round to posting about some DIY homemade jams and preserves that we made for family last year.
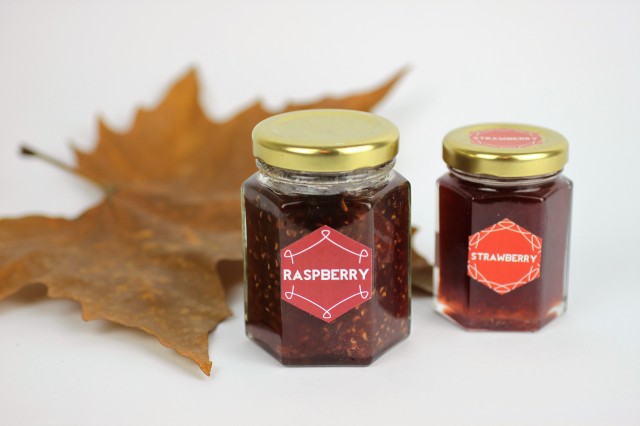
Homemade Jam | Shelley Makes

The other half took the lead on the jam-making, while I went to work on the labels. I have to say, the labels make such a difference, making this DIY look way more professional than it actually is!

Making jam (instructions courtesy of Jack):

To make the jam, use 50% fruit, 50% sugar, a splash of lemon juice (as the pectin in it helps the jam to set), and a small knob of butter. In terms of equipment, you will need:

Homemade Jam | Shelley Makes

  • Saucepan
  • Cooking thermometer
  • Set of glass preserve jars (my hexagonal jars are from Hobbycraft)
  • Reduced fruit (whatever you fancy / is on offer)

Stew the fruit in a saucepan before adding the sugar, and then slowly, using a thermometer, bring the temperature up to 80°C to a slow simmer, stirring continuously.

Homemade Jam | Shelley Makes

Once all the sugar has dissolved, slowly increase the temperature to 104°C (for approximately 5 minutes). Allow the jam to cool and then pour the liquid into sterilised jars.

After a couple of hours (or once cool) the jam will set, and is ready to enjoy! You can pick any fruit you like – we made raspberry, apricot, and plum jam, plus some homemade chipotle.

Homemade Jam | Shelley Makes

Making the labels:

I used InkScape to make the labels, and decided on a hexagonal design to match the shape of the jars. I used the font Revolution from DaFont.com, as it was the most legible despite the small size.

We also made Jelly Shack barcode labels (using a free font called bar code from DaFont.com) for the back of the jars as an alternative to a ‘Made by’ sticker (as our names are Shelley and Jack, Jelly Shack has become our co-brand – cheesy I know, but it was just a bit of fun!)

Homemade Chipotle | Shelley Makes

I arranged the labels on the sheet so that I could cut them out easily using a rota-trim, but for added ease, you could use a Silhouette machine (I didn’t get one until after Christmas – doh!)

Once cut out, it’s simply a case of sticking your labels in position, and voila! I wrapped each of the sets up in orange tissue and cellophane, with a festive illustration and name tag on the front.

Though inexpensive, these treats went down way better than any present I’ve ever bought!

DIY Air Dry Clay Christmas Stars

This Christmas (I gave you my heart) – ahem, I decided to take my first foray into air dry clay. To follow is a series of posts to document the things I’ve made – the first is DIY festive tree stars!

Reindeer star

You will need: Pack of DAS air dry clay, rolling pin, star cookie cutter, a straw, set of festive stamps (mine were from Hobbycrafts), string (for hanging on your tree).

In the absence of a rolling pin (I know, I know, #Amateur), I used the closest thing to hand – a pint glass, and used a Grana Padano cheese knife instead of ‘professional’ clay cutting tools.

How to Make Tree Stars:

Start by opening your pack of clay and rolling out a small blob to about 5mm thickness. Once rolled, lay your cookie cutter over the top and press to indent. Remove the excess clay from the outside.

Next, you’ll want to make a small hole so that you can hang your decoration up. I used a drinking straw, pressing it in and twisting it on the spot until the dot of clay lifted and could be removed.

Star

Next comes the exciting bit – providing you’ve found yourself an array of festive shapes and stamps, you can start creating your unique army of decorations by simply pressing them onto your star.

Try to use uniform pressure to make your shape stand out consistently on all sides. To smooth any edges, wet your finger (I licked mine), and gently run over the edges – et voila!

Don’t worry about the colour of the clay when you get it out of the pack – it will start a sludge grey whilst malleable, but dry to a nice bright white – this may take up to 48 hours.

Robin star

As my boyfriend and I are due to move house next week (just before Christmas!), I also made a trio of stars for him to unwrap on Christmas day – one of which I stamped to say ‘Home’.

Whilst half of the stars are for decorating the tree, I decided to give some away as gifts, tieing them on to A5 cards (much like my Orange Thank You cards) to create Christmas card-present combos.

These tree decorations are really easy to make and quite therapeutic too. They’re also very easy to personalise, perfect if you like things to be ‘just so’ or want to give them away as gifts.

Easy and fun for adults and children alike, I can’t wait to decorate!

Inspiration: Embroidery Hoop Art

When I was younger, I used to cross-stitch (I vividly remember using a lot of pink thread to sew Mr. Blobby), however I’d always thought of embroidery as being more old-fashioned. Recently, with the craft comeback, ‘old’ crafts like sewing, embroidery and dress-making have seen a revival, with talented craftspeople and artists turning to embroidery hoops as modern day canvases.

I love the following designs for their simplicity and humour – they certainly bring embroidery into the 21st century, and I love how the hoops frame the finished work. When searching for inspiration, I came across Mr X Stitch, the ‘kingpin of contemporary embroidery’, and found a lot of wares on Etsy.

Embroidery Hoop Inspiration

When you’re young, your first introduction to cross-stitch and similar crafts is through patterns, but I love the idea that you can just come up with your own idea, and start sewing it onto a hoop, even creating an abstract embroidery hoop by randomly selecting coloured thread and patterns.

As well as using these as inspiration, you could take inspiration from greetings cards, immortalise funny things your kids have said, or frame personal mottos. These are great for decorating the walls of your own home, or giving as thoughtful gifts to friends and family to brighten their day!

For further information, visit these sites:

1. The Love Whale Embroidery Kit, Studio MME | 2. Little Mountain Range, Powerfulanimals | 3. Geometric Hand Stitched Embroidery Hoop, Powerfulanimals | 4. Beetle Geometric Asymmetrical 4 inch Embroidery, Rehabbed Handmade Vintage | 5. Dinosaur Embroidery Hoop, Stephanie Tillman | 6. Hug 4 inch Hoop Art, Grace Gatley Textiles | 7. Friendship Sloth, Stephanie Tillman | 8. Oh, Hey! 5 inch Embroidery Hoop, Sarah K Benning

DIY Paper-Cut Christening Card

On Sunday, Jack and I went to our first Christening for a baby girl named Lauren. This was the first time we’d met Lauren, but as we’re huge fans of her parents, we knew we’d be sold!

To mark the occasion, we decided to make a personalised paper-cut card with a scalpel and a steady hand… you have to be careful to leave all parts connected to the main frame.

IMG_0711 USE

In Pictures:

The finished result you see here was done by Jack – he was far more skilled with the craft knife than me! If in doubt, leave it to the experts!I’d love to know what you think?

What are your Christening creations?

DIY Origami Easter Bunny Baskets!

Happy Easter everyone! Today Jack and I went to a family meal for Easter Sunday. Not wanting to go empty handed, we quickly rustled up some mini DIY origami bunny baskets for each of the guests.

Bunny hamper

These are really easy to do – all you need is some coloured paper, white card, individually wrapped chocolates, scissors, pens or colouring pencils, and some optional Easter chicks for decoration.

Instructions:

Start by making simple origami boxes from squares of A4 coloured paper – 1 page (cut into a square) = 1 box. There’s a great how-to YouTube video from Origami Instructions here.

Cut out your bunny heads from white card – if you make one, you can then use this as a template for the others – and draw on their pink ears and whiskers using coloured fine-liner pens.

IMG_0570 USE

Stick the bunny heads to individually wrapped chocolates (we used Ferrero Raffaello) using Sellotape sticky fixers, cut into small blobs, and there you have your rabbits!

Lastly, fill the boxes with shred, add your bunnies, plus any extra Easter things you have such as chicks and mini eggs – and there you have your rabbit hampers, or rabbit hot-tubs, as I like to call them!

Easter bunny hamper

We also had a go at making mini versions using a square from A5 paper (half the size), and left these on the neighbour’s door steps with a ‘Happy Easter’ message on an egg-shaped piece of paper:

Mini bunny

This is a really cost-effective way of giving everyone a special gift at Easter and people often care more about the time and thought put in, than about the amount of money spent.

Oh, and the bunny Easter cards and upcycled envelopes went down a treat too!

Making Gift Bows with Recycled Paper

On the weekend I wrote a post showing how to make DIY gift bows. The bow pictured was made from a Lancome advert, but I also had good results with the front cover from The Sunday Times magazine…

If truth be told, I enjoyed taking photos of these as much as I enjoyed crafting them. For full instructions, see my previous post, otherwise I hope this picture helps give an overview of the how-to:

Sunday Times gift bow

It’s easier than you might think, and quite therapeutic! What do you think to this one? Now just to get someone a present so I can wrap their gift… Please feel free to Pin and share =)