DIY Halloween Paper Quilled Pumpkins

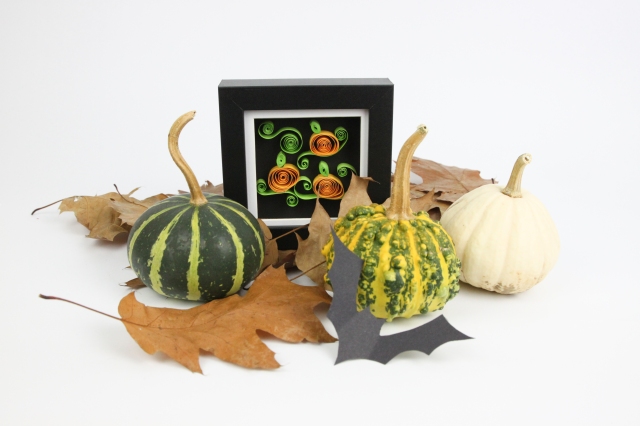
Over the summer I shared my first sponsored Bostik blog tutorial showing how to make a DIY Bug Hotel. Well, my next Bostik blog is a little crafty something for Autumn, featuring cute paper quilled pumpkins and Bostik Micro Dots – perfect for Halloween decorations, and suitable for beginners!

DIY Quilling Halloween Pumpkins_Shelley Makes-9338

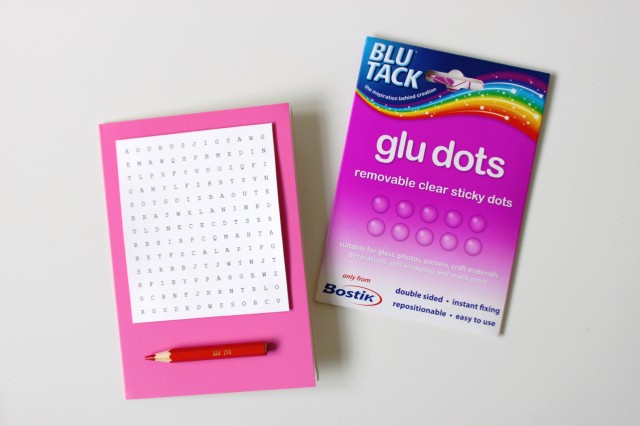
Before this project I had never quilled before, but after finding lots of inspiration and a few tutorial videos online (showing how to create basic shapes), I decided to give it a go. I found all of the necessary supplies at Hobbycraft, and was kindly gifted my micro glue dots by Bostik.

For this DIY, you will need the following:

DIY Quilling Halloween Pumpkinsl_Shelley Makes-9167

Instructions:

The quilling pen / needle is a really simple tool to use. You simply put the end of your strip of quilling paper through the slot, and then, using your thumb to guide the paper, turn the pen in your other hand so that the paper rolls round the end into a tight coil. The tighter you wind, the tighter your coil will be.

DIY Quilling Halloween Pumpkinsl_Shelley Makes-8959

DIY Quilling Halloween Pumpkinsl_Shelley Makes-8972.jpg

Once the paper is fully wound, carefully remove it from the end of your quilling pen and set it down on the side so that it can ‘relax and unwind’. I bought a quilling template board to help me get to grips with how to turn the coils into different shapes. If you’re aiming for uniform shapes and sizes I’d definitely recommend getting one. It can help you create circles, ovals, hearts, tear drops, squares, triangles…

DIY Quilling Halloween Pumpkinsl_Shelley Makes-9011

DIY Quilling Halloween Pumpkinsl_Shelley Makes-9062

Once your circle is the size you want glue the end down to secure it. You can then begin pinching and coercing it into the shape you want. I went for simple oval orange pumpkins, and then made some vines using shorter lengths of green quilling paper, rotating the ends in different directions to create opposite flicks. For the stalks, I made tight green coils, and then squidged them into an ‘eye’ shape.

I wanted my picture to have a black background so I cut a square to size to act as my backdrop. Before I started gluing anything in place, I had a play around with where I wanted each pumpkin to sit, so I could be sure I was happy with their positions. Once you’ve got a design in mind, the sticking can commence.

DIY Quilling Halloween Pumpkinsl_Shelley Makes-9292

Micro Dots are great for sticking small, delicate or irregular shapes, ribbon, or embellishments as there’s no drying time required. The tiny dots act like a sticker transfer so you simply stick your object onto the sheet, rub down, and lift off – the glue dots will have transferred to your object, making it ready to stick.

DIY Quilling Halloween Pumpkinsl_Shelley Makes-9092

DIY Quilling Halloween Pumpkinsl_Shelley Makes-9210

As the paper quills are very thin, I thought the micro glue dots would be great for making each tiny surface sticky whilst remaining hidden / see-through from the front. It also means you won’t get wet glue on your fingers – just be careful you don’t put anything down on the transparent sheet if it’s facing up!

DIY Quilling Halloween Pumpkinsl_Shelley Makes-9277

Once your shapes are glued in place it’s time to pop it into your frame, and voila! You’re ready for Halloween. The shapes I’ve used here are really simple to make, but if you fancy doing something more adventurous then there are loads of printable templates available online. Do check out Pinterest.

DIY Quilling Halloween Pumpkins_Shelley Makes-9327

You can go as big and bold as you like. I’d love to see what you come up with!

Disclosure: This post is sponsored by Bostik as part of the HIBS100 #BostikBlogger series. I was sent a box of Bostik glue goodies to create this post. I hope you like this DIY series.

DIY Bug Hotel / Insect House with Bostik

As you all know, I love any excuse to make things, so I was delighted to be invited by HIBS100 to become a DIY Bostik blogger for six months. My mission, which I’ve chosen to accept, is to create a DIY tutorial on a set theme each month, and share it with you. The first theme, to my delight, was Garden Decor!

DIY Bug Hotel_Shelley Makes-8612

Now, Bostik make some great products for crafters – in fact, you’ll have seen some of their products in my DIYs before. The glue dots and foam pads are excellent for card-making, so I was excited to try out some of the other products in the range. To get me started, Bostik sent me a box of glue-based goodies to experiment with, including leather adhesive, all-purpose glue, white glu, blu stick (a glue stick that starts blue and dries white), fast tak spray glue, glu dots, micro dots, foam pads and glitter pens!

DIY Bug Hotel_Shelley Makes-8568

This summer I’ve been loving spending more time outdoors, watching the comings and goings of nature’s pollinators, so I thought I’d have a go at making my own insect house for our allotment. We have a bug hotel / insect house in our back garden, and there has been no room in the inn (as it were), since the first day it went up! As it’s so popular with flying folk, I used this design for inspiration.

To make your own bug hotel, you will need the following materials:

  • Bostik white glu (PVA)
  • Plank of wood – mine was planed smooth timber (18mm x 94mm x 1800mm) from B&Q
  • Sheet of plywood (for the roof) – have a peek in your local wood shop’s ‘scrap’ bin (alternatively, you could use your smooth timber and have a thicker roof…)
  • Outdoor paint – a Cuprinol tester pot (£2) will be more than enough
  • Blue painter’s tape or masking tape (to hold your house together while the glue dries)
  • Sandpaper (if you have it – optional)
  • Bamboo canes (optional)
  • Wooden ladybird to decorate (optional)
  • Bostik glu dot to afix ladybird (optional)

Continue reading

#CraftBlogClub Secret Santa 2017

Happy New Year everyone! Better late than never, I wanted to finally share my #CraftBlogClub Secret Santa with you! If you’ve not heard me bang on about this before, the CBC Secret Santa is a brilliant initiative by Fiona and Katie who run the weekly #CraftBlogClub Twitter chat every Tuesday at 8pm.

Maker:S,Date:2017-9-12,Ver:6,Lens:Kan03,Act:Lar02,E-ver

Each year, anyone with a passion for craft can take part to make and receive a handmade present from the #CraftBlogClub community. Though I haven’t managed to join the chats much lately, my experience of this community is that they’re one of the warmest, most encouraging bunch of people you could ever wish to e-meet. It’s always a pleasure, so do join in if you can!

Somehow this was my third year taking part (where does the time go?!). In Year 1 you might remember that I made a DIY felt cupcake needle-book and cupcake pin-cushion ring for ZoFlo, and last year I made DIY homemade goats milk and honey soaps for Laura, which turned out quite well.

This year, my Secret ‘Santee’ was Naomi Jade. After a little stalk of her blog and social channels, I saw that she was a lover of all things cosy and also quite girly, so I decided to make her a DIY miniature wall hanging. I used a weaving kit that I got for free with a Mollie Makes magazine earlier this year.

Continue reading

Homemade DIY Goat’s Milk & Honey Soaps

This year I was delighted to take part once again in the #CraftBlogClub Secret Santa. In case you haven’t heard of it, #CraftBlogClub is a weekly Twitter chat which takes place between 7 – 8pm every Tuesday, hosted by the lovely Katie (@katiegetscrafty) and Fiona (@fizzijayne), with occasional guest hosts.

craft-blog-club-secret-santa_shelley-makes-5365

As well as chatting all things craft, throughout the year, Katie and Fiona love to set us seasonal crafty challenges from spring-cleaning (stash swapping) to upcycling, but my favourite has to be the annual Secret Santa where everyone is paired off to create homemade presents for each other.

craft-blog-club-secret-santa_shelley-makes-5458

You might remember that last year I made a DIY felt cupcake needle-book and cupcake pin-cushion ring for ZoFlo, and was lucky to receive an awesome crochet stash from Kate at Albert & Me.

This year I was paired with @knitknatlaura and decided to try my hand at homemade soaps for the first time. A while ago, I found this pin on Pinterest, and decided to give this ten minute DIY a go. The tutorial is by Heidi at Happiness is Homemade – it’s super easy, and the results do look really great.

Continue reading

Homemade Christmas Candles in a Jar

A few years ago my boyfriend and I made homemade jam (with DIY jar labels) as Christmas presents for friends and family. A lot of people kindly returned their empty jars to us (no doubt hoping for more jam), but last Christmas we decided to do something a little different with them – homemade jar candles!

diy-christmas-candles-in-jar-2094

You will need:

This DIY is incredibly simple, and doesn’t take long at all. Start by melting your wax over a saucepan on the hob, in much the same way as you would melt chocolate. The wax should never be over direct heat, so lay your saucepan of pellets (or old candle wax) into a bigger saucepan with boiling water in the bottom.

diy-christmas-candles-in-jar-2184

It’s best not to leave the wax unattended, and not to let it get too hot, so keep an eye on it at all times, stirring occasionally. While your wax is heating up, prepare your jars – make sure they are clean and dry. Add your weighted wick so that it stands up in the centre of your jar, cutting it to the desired height.

diy-christmas-candles-in-jar-2389

Once all wax lumps have melted on the hob, remove the pan from the heat. If you are adding a colour or fragrance, now is the time to do so, but mine were just plain, resulting in a white wax. Whilst molten, pour your wax into your jars to the depth desired. Once poured, leave to cool and set on a flat surface.

Continue reading

DIY Wordsearch Card

In May of last year I made my Grandma a DIY wordsearch card to combine a few of her favourite things – puzzles, and gardening. Well, a while ago, for some reason, I decided that this DIY wasn’t good enough for the blog, and I deleted it, and now – over a year later – I’ve changed my mind.

DIY wordsearch card on Shelley Makes.JPG

This is one of the simplest DIY cards you could possibly hope for. There are tonnes of free wordsearch generators available online that allow you to personalise your puzzles. I used one called www.puzzle-maker.com, where you can choose between making a custom wordsearch or a custom crossword.

diy-wordsearch-card-shelley-makes-ii

Continue reading

DIY Wooden Planter for your Doorstep

If you follow me on Instagram you might have already seen a few snaps of my latest DIY – a wooden planter for the dahlia on my front doorstep! My neighbour actually gave me the idea for the planter – she has an almost identical one in a dark lavender colour on her doorstep, and I got jealous.

DIY Wooden Planter by Shelley Makes (46)

Looking for something similar that would make my plastic-potted dahlia feel a little more welcome (and suave), I went on the hunt. On my first stop I found a ready-made wooden planter in Homebase. It looked great, but with a £24.99 price tag, I wasn’t quite prepared to part with the cash.

With a few hours left in the afternoon, I put the question to my boyfriend – “Can we make this?” In typical Jack style, he replied, “Yea”, and so we went around Homebase picking up the bits and pieces we needed to make it ourselves instead. We found cladding for £5.99, and some spruce for £6.

To make your own DIY wooden planter, you will need:

  • 2x lengths whitewood spruce (33mm x 33mm x 1.8m)
  • A pack of tongue-and-groove cladding
  • Saw (for cutting the wood to length)
  • Table saw / router (for creating the grooves)
  • Screws and a screwdriver
  • Some clamps
  • Paintbrush
  • Outdoor paint (We used Cuprinol Garden Shades in Malted Barley)

DIY Wooden Planter by Shelley Makes (47)

Continue reading

DIY Papercut Christening Card

Last Sunday, Jack and I went to the christening of a baby boy named Carl. We made a paper-cut card for Carl’s big sister Lauren when she was christened a few years ago, so we thought we’d stick to the same style for her little brother, but this time using my Silhouette cutting machine, instead of a scalpel!

DIY Paper-Cut Christening Card (10) - Copy

Jack designed the paper-cut image using InkScape (free downloadable vector graphics software), which allows you to import images and convert them to line art, as well as draw various shapes. Jack imported three free line-art images from Google – a heart, a church, and a balloon. After importing and embedding the images, he traced the bitmaps and converted the images into two colours (black and white), so that he could see which sections would be cut out, and which would stay connected.

Once the vector had been generated, Jack modified the image using the node tool, which allowed him to remove unwanted features (such as complicated details on the windows), as well as change certain design elements (such as the door archway). He also created a cute picket fence and bunting.

DIY Christening Card InkScape

Continue reading

Oliver Bonas Photo Engagement Present

A few months back one of my good pals from university got engaged! Both her and her partner are in the navy, so they often have to go a few months without seeing each other when they are posted out to sea. I wanted to make them an engagement present that would make their time apart a little easier.

IMG_1885 USE

I found these cute 2 x 2″ gold and glass double-sided square photo-frames at Oliver Bonas (one of my favourite shops), and thought they’d fit the bill perfectly, so bought two – so they can have one each.

I felt like a bit of a stalker finding photos of the two of them to use – thank goodness for Facebook! Apparently I chose well though, as they have print-outs of these photos already in their house.

Continue reading

Easy DIY Origami Easter Bunnies

This time last year I found a tutorial to make some really easy (yet excessively cute) DIY origami Easter bunnies. They were filled with chocolate mini eggs and given to friends, family and neighbours.

DIY Origami Easter Bunny - Shelley Makes (19)

You can find the DIY tutorial over at Oh So Very Pretty. The initial design is by someone called Jacky Chan, and Leyla Torres has done a helpful YouTube video if you’re a visual learner like me!

Continue reading