#CraftBlogClub: DIY Cupcake Pin-Cushion Ring

In my last blog post I told you about the felt cupcake needlebook that I made for ZoFlo as part of the #CraftBlogClub Secret Santa. This post looks at the accompanying DIY cupcake pin-cushion ring!

DIY cupcake pin cushion ring | Shelley Makes

This ring DIY is an amalgamation of two tutorials I spied on Pinterest – the main one is by Obsessively Stitching, whose excellent tutorial told me how to make a basic cupcake pin-cushion ring.

Cupcake felt needle book | Shelley Makes

Against Obsessively Stitching‘s advice, I made my pin cushion using felt, rather than fleece, as it had to match Zoe’s needle-book (soz), but I must admit I was still happy with the end result.

DIY cupcake pin cushion ring | Shelley Makes

To make a cupcake pin cushion ring, you will need:

  • A4 sheet of felt (in two colours – 1 for base; 1 for frosting)
  • A bottle cap (such as Cherry Coke or 7UP)
  • Sewing thread (mine is Hobbycrafts Value Crafts range)
  • Stuffing (e.g. soft toy filling – hi-loft polyester)
  • Sharp scissors
  • An elastic hair-band (You can get these from Boots, Tescos…)
  • Red button (optional – for cherry)
  • Dress pins

Instructions:

For the cupcake ‘frosting’, I cut around a tea-light candle jar about 3.5 inches in diameter (a bit bigger than Obsessively Stitching‘s recommendation). Next, I threaded around the edge of the circle, before tugging the ends to make it gather – it looks like a baby jelly fish until stuffed!

Continue reading

#CraftBlogClub: DIY Cupcake Felt Needlebook

Back in November I told you about the #CraftBlogClub Secret Santa, where a group of crafty bloggers make and swap homemade presents with fellow festive craft-bods in time for Christmas.

Cupcake felt needle book | Shelley Makes

I absolutely loved the idea, and signed up straight away. I can now reveal that I was paired with the amazing Zoe from ZoFlo. I spent an age researching Zoe’s blog and social channels for clues about her hobbies, likes and dislikes (read: stalking!), to help me pick a theme for her present.

Felt cupcake needle book | Shelley Makes

I learnt that she is a fan of The Great British Bake Off, the John Lewis Christmas ad, country bike rides, and The Great British Sewing Bee. After umm’ing and err’ing, I decided to combine two of her favourite things, by making a cupcake-themed needlebook and pin cushion ring (cakes and sewing, huzzah!).

Whilst scouring Pinterest for inspiration, I came across this fantastic tutorial from Sew4Home which really fired my imagination. Whilst Alicia’s tutorial featured a lovely cat on the cover, I realised I could adapt this for my cupcake theme, and the instructions were really clear and easy to follow.

Cupcake felt needle book | Shelley Makes

Continue reading

Sewing Geometric Christmas Cards

Christmas is one of my favourite times of year – I love the cosiness, and the handmade gestures. This year, I decided to make a few Christmas cards for my nearest and dearest.

Four cards

Inspired by the branding of Mote & Produksjon (Fashion & Production), I decided to get with the trend and sew different geometric patterns onto the front of my A5 cards.

Geometric Sewing Card

Instructions:

Start by creating your A5 folded cards (cutting down from A4 if necessary). I used dark colours (a navy, and mocha) that would contrast with my cream cotton thread.

I decided to make my pattern 5cm x 5cm, so I cut out a template square to size that I could position where I wanted the pattern to be, and marked the corners with a pencil.

Using the marks as a guide, I then made further pencil marks every 1.25cm until I had a square grid consisting of 25 dots. Using a needle, I then pierced holes over each of the dots.

Geometric shape

I used a cream cotton thread for my patterns, and selected the designs by Mote & Produksjon that had the most festive feel – aka, the ones that most resembled stars and snowflakes!

Once each pattern was complete, I tied the ends of the thread together on the inside of the card and cut the loose ends. I then added a smaller black paper insert to each card.

Sewing Geometric Cards

I tried two different techniques for this – on some I used double-sided tape to secure the insert, whilst on a couple of the designs, I stitched the spine to bind the insert to the card.

Personally, I love a good theme – you could also make matching gift tags using the same emblems. What do you think? Are you handy with a needle and thread?

What Christmas cards have you been making?

Crafty Fox Market, Autumn 2014

On Sunday, Jack and I visited the unique Crafty Fox Market in Brixton. Held at The Dogstar, this quirky pub became a craft showroom for the weekend, packed on all three floors with crafty stall-holders.

Crafty Fox Market

My favourite three stall-holders were Takae Mizutani and Sons – who had cute ‘snail’ plant saucers and tiny horse & fort egg cups; Oh My Gee – who sold cards consisting of colourful animal prints and unexpected slogans such as ‘Twat’, and ‘Piss off’; and Floss & Mischief – who is leading the ‘trendy needlework’ scene with a range of taxidermy themed sewing kits and thread art.

Takae Mizutani and Sons

As well as the stalls, there were also a few pay-as-you-go craft workshops, including tote bag screen-printing (£5) with Mr. Wingate, bunting necklace making with Lucie Ellen (£15), or you could sit down with a cup of tea and a casual skull badge cross-stitch with The Sewcial Circle (£3).

For our tote bag, we designed a butterfly screen-print. I’m not gonna lie – it didn’t come out quite as expected; Lesson #1 of screen-printing – remember the Inverse Rule. That said, it did make me realise how easy it is to design and make your own gifts for people, with a little practice!

IMG_3105

I also made a bunting necklace with the lovely Lucie Ellen. It’s fair to say that Lucie did all the hard work in prepping the wooden bunting, however I used my new-found plier skills to connect them.

All in all, we had a great day! I’d highly recommend it if you’re looking for somewhere quirky to go to catch up with crafty friends in London. It’s a very laid back atmosphere, plus cake galore!

For better pictures (it was very dark inside), visit the Crafty Fox Market Facebook page.

Inspiration: Embroidery Hoop Art

When I was younger, I used to cross-stitch (I vividly remember using a lot of pink thread to sew Mr. Blobby), however I’d always thought of embroidery as being more old-fashioned. Recently, with the craft comeback, ‘old’ crafts like sewing, embroidery and dress-making have seen a revival, with talented craftspeople and artists turning to embroidery hoops as modern day canvases.

I love the following designs for their simplicity and humour – they certainly bring embroidery into the 21st century, and I love how the hoops frame the finished work. When searching for inspiration, I came across Mr X Stitch, the ‘kingpin of contemporary embroidery’, and found a lot of wares on Etsy.

Embroidery Hoop Inspiration

When you’re young, your first introduction to cross-stitch and similar crafts is through patterns, but I love the idea that you can just come up with your own idea, and start sewing it onto a hoop, even creating an abstract embroidery hoop by randomly selecting coloured thread and patterns.

As well as using these as inspiration, you could take inspiration from greetings cards, immortalise funny things your kids have said, or frame personal mottos. These are great for decorating the walls of your own home, or giving as thoughtful gifts to friends and family to brighten their day!

For further information, visit these sites:

1. The Love Whale Embroidery Kit, Studio MME | 2. Little Mountain Range, Powerfulanimals | 3. Geometric Hand Stitched Embroidery Hoop, Powerfulanimals | 4. Beetle Geometric Asymmetrical 4 inch Embroidery, Rehabbed Handmade Vintage | 5. Dinosaur Embroidery Hoop, Stephanie Tillman | 6. Hug 4 inch Hoop Art, Grace Gatley Textiles | 7. Friendship Sloth, Stephanie Tillman | 8. Oh, Hey! 5 inch Embroidery Hoop, Sarah K Benning

Shelley Does… Hobbycrafts!

You might remember a few weeks ago I told you my excitement at getting tickets to Hobbycrafts at the ExCel centre. Well, today was the day, and my sister and I boarded the train to London.

Fabrics

Hobbycrafts is a fair for ‘avid crafters’, although with no major brands present, it does have quite a ‘market’ feel – complete with the sharp elbows of fellow bargain hunters. Be prepared!

Hobbycrafts stall

The stalls were selling craft supplies from beads, paper, cross-stitch, knitting needles, thread, and ribbon, through to fabric, with multiple stalls (decked in bunting) selling stickers and stick-on gems.

Knitting

Some of the arts & crafts supplies were a bit kitsch (or as I called it, ‘quiche’, before I refined my crafting lingo), however I wanted to talk about some of the stand-out stalls!

Sewing workshop

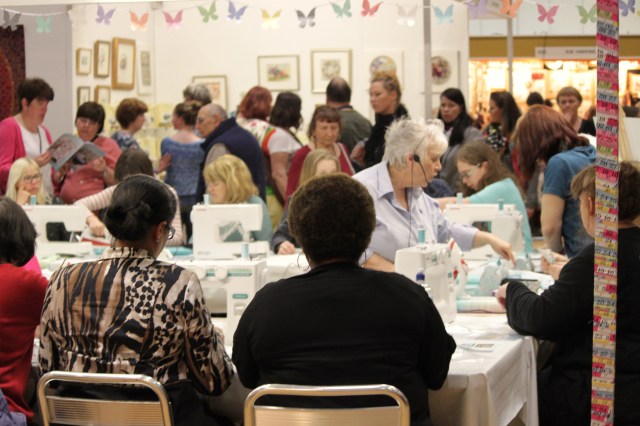
The best stands were interactive, offering sewing machine tutorials, or the opportunity to sit down and knit. Everyone was pleased to talk to the stall owners and learn from their expertise.

My Favourite Stall:

My favourite stand, hands down, was Decopatch.co.uk, which had a shop section but also a sit-down craft section where you could ‘try before you buy’ and have a little fun being creative!

Decopatch.co.uk

I’ve never done decoupage before, or even really considered it, but everyone at the crafting table looked very content as they played with different patterned papers and made decorative figurines.

Decopatch.co.uk

There was a lot of choice of things to decorate so you really can choose something personal to make a thoughtful gift – from a letter of the alphabet, to a jewellery stand, to a chair.

I imagine that a deco-patch café would be great for birthday parties, like a ceramics café!

My Second Favourite Stall:

My next favourite stand, ironically, was where the stall-holder told me abruptly ‘no photography’, as I was drawn in by the most gorgeously scented dried flowers and potpourri – NaturaLeigh. In the stall-holders defence, someone had just stolen some of her goods, so she wasn’t the happiest bunny!

Roses

The dried rose-buds and lavender mixes were to be used within scented ‘home-furnishing’ kits. They also sold natural heart-shaped soaps which would make lovely gifts or favours.

I only bought one item at the fair – a mini alphabet stamp set, and was tempted by some pretty gilded scissors. Despite a few quality exhibitors, I’m not sure if I’ll head back to Hobbycrafts next year.

I think it’s probably aimed at a slightly older crafter, and I would have liked more inspiration on specific craft projects, not just products. Many of the stalls were quite samey, which was a shame!

If you went this year, tell me, what did you think?